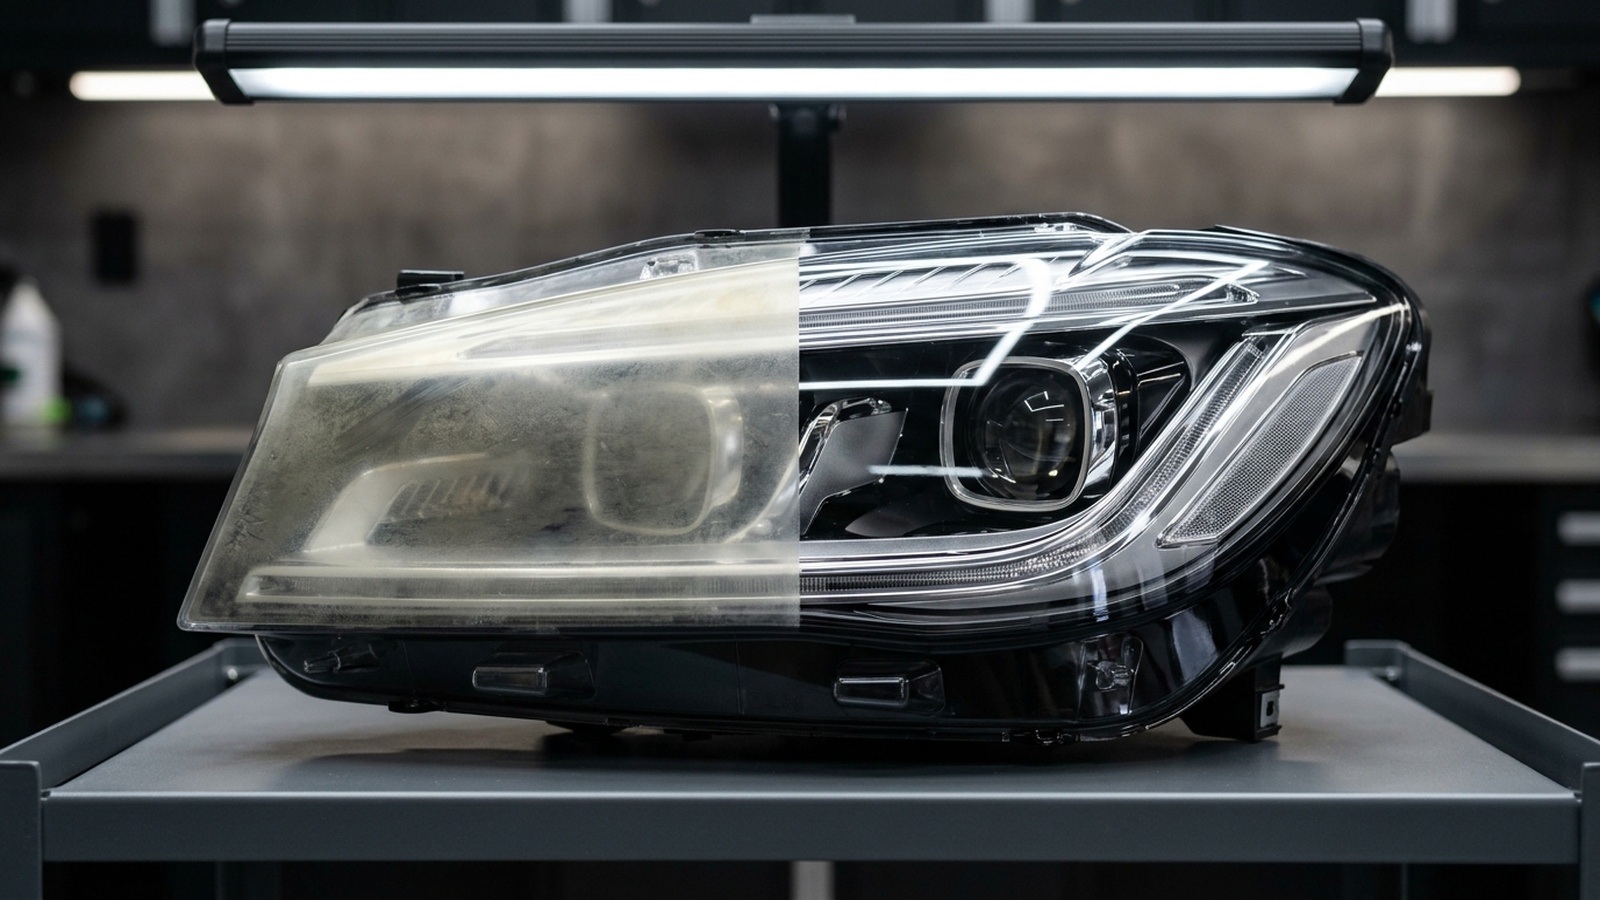
Cloudy headlights are more than an ugly flaw. They are a road hazard. Sun breaks down clear plastic lenses fast. Investing in professional headlight restoration and uv protection restores bright night vision. It also helps pass roadworthy checks. Faded headlights can reduce night road illumination by up to eighty percent, creating dangerous blind spots on unlit regional highways. In regional areas such as Armidale and across the New England Tablelands, high-altitude ultraviolet radiation, sub-zero winter frosts, and abrasive road gravel accelerate lens oxidation, making multi-stage resurfacing essential to restore optical clarity and vehicle resale appeal.
Headlight restoration and uv protection is a specialised multi-step resurfacing process that wet-sands degraded, yellowed polycarbonate plastic before polishing the lens to razor-sharp optical clarity. Applying a durable 2K urethane or ceramic UV sealant prevents solar oxidation from returning, restoring full night headlight beam output and roadworthy compliance.
- Why Modern Polycarbonate Headlight Lenses Turn Yellow
- Nighttime Driving Safety and Light Output Losses
- NSW Roadworthy Inspection Standards and Pink Slip Rules
- The Impact of Armidale High UV and Winter Frosts
- Why DIY Wipes and Toothpaste Kits Fail Quickly
- Multi-Stage Wet Sanding: Grits 800 to 3000
- Machine Optical Polishing and Clarity Restoration
- Applying 2K UV Clear Coats and Ceramic Protection
- Headlight Repair Method Comparison: DIY Wipe vs Polish vs Pro Restoration
- The 10-Point Headlight Restoration Workshop Checklist
- Pre-Sale Visual Value and Roadworthy Buyer Reassurance
- Routine Care Habits to Keep Headlights Clear
- Fog Light and Tail Light Lens Polishing
- Paint Protection Film as a Physical Headlight Shield
- Headlight Aiming and Optical Beam Alignment
- High-Output Bulb Upgrades and Lens Clarity
- Transport for NSW Vehicle Standards and Safety Rules
- People Also Ask About Headlight Restoration
- Frequently Asked Questions on Headlight Care
- Conclusion: Restoring Night Driving Safety and Vehicle Value
Why Modern Polycarbonate Headlight Lenses Turn Yellow
In the past, car headlights used heavy glass lenses. Glass resisted scratches and never turned yellow. But glass was heavy and shattered easily in road accidents. Car makers switched to plastic lenses in the 1980s. Plastic is light and impact safe. It can be moulded into sleek shapes.
However, polycarbonate has one major flaw: it is sensitive to ultraviolet light. Sunlight breaks down polymer chains in the plastic. To protect the lens, car makers spray a thin acrylic UV clear coat over the plastic at the factory.
Over time, this coating takes a beating. Sun, rain, and gravel wear away the clear coat. Bare plastic is then exposed to sun. The plastic oxidises fast, turning yellow and brittle.
Nighttime Driving Safety and Light Output Losses
Cloudy headlights are a serious road safety hazard. When headlight lenses oxidise, they do not just look dirty. The milky plastic scatters light beams in random directions instead of focusing light down the road.
Yellowed lenses cut beam distance by up to 80%. Drivers lose reaction time when spotting kangaroos or road debris on dark roads. Scattering light also blinds oncoming drivers.
Restoring lenses brings back sharp beam focus. Crisp lenses let halogen, xenon, and LED bulbs project light down the road as the factory intended. This keeps your family safe on dark country trips.
NSW Roadworthy Inspection Standards and Pink Slip Rules
In New South Wales, cars over five years old need an annual Pink Slip check. Authorised inspectors check key safety items, including headlights.
Under vehicle standards rules, headlights must produce a steady white beam that illuminates the road ahead. If headlights are yellowed or cloudy, inspectors can fail the vehicle. The car cannot be registered until headlights are restored or replaced.
Replacing complete headlight assemblies on modern cars is expensive. Modern LED assemblies can cost between $1,200 and $3,500 per side. Professional restoration fixes foggy lenses for a fraction of that replacement cost.
The Impact of Armidale High UV and Winter Frosts
Cars in Armidale face distinct climate challenges. The town sits 1,000 metres above sea level on the New England Tablelands. This high altitude brings higher levels of solar UV radiation throughout the year.
Intense UV radiation speeds up polycarbonate oxidation. Lenses in regional New South Wales often turn yellow years faster than cars parked in coastal garages. In winter, overnight frosts drop temperatures below freezing.
Frost freezes water in tiny rock chips. Freezing expands cracks, making the clear coat peel. Rural gravel roads also pelt lenses with sharp dust.
Why DIY Wipes and Toothpaste Kits Fail Quickly
Many drivers try quick fixes like rubbing toothpaste or using chemical wipe kits from auto parts stores. Toothpaste contains mild baking soda abrasives that buff off loose surface film, making the lens look clear while wet. But toothpaste cannot remove deep yellowed plastic.
Chemical wipe kits use solvents like acetone or xylene to melt surface plastic flat. While this makes the lens look clear for a few weeks, it removes what remains of the factory UV coat. Because DIY kits lack durable UV blockers, the bare plastic oxidises faster than before, turning darker yellow within three months.
True restoration requires mechanical sanding to remove dead plastic, followed by a durable 2K UV protective clear coat.
Multi-Stage Wet Sanding: Grits 800 to 3000
Professional restoration is a multi-stage sanding process. Technicians mask surrounding painted bumper panels with multi-layer tape to protect the paint.
Sanding starts with 800-grit wet paper. This coarse cut sands away dead yellow plastic. The detailer sands in straight lines with water until yellow slurry turns white.
Next, the detailer sands with 1200-grit, 1500-grit, and 2000-grit paper. Each finer grit removes scratches left by the previous paper. The final sanding step uses ultra-fine 3000-grit foam finishing discs. This leaves the plastic silky smooth with a light satin haze.
Machine Optical Polishing and Clarity Restoration
Next, technicians polish the lens. Detailers use dual-action polishers with firm foam pads and special plastic compound.
The spinning pad works abrasive compound into the sanded lens, removing 3000-grit sanding marks. Frictional heat levels out microscopic ridges, turning hazy plastic into crystal-clear glass. Technicians then switch to fine finishing polish to unlock maximum optical clarity.
After polishing, the internal projector bulbs and chrome reflectors become razor-sharp. But the lens is now bare polycarbonate. Without immediate UV protection, the clear plastic will yellow again within weeks.
Applying 2K UV Clear Coats and Ceramic Protection
The final and most important step in headlight restoration and uv protection is applying a new UV protective layer. Professional workshops use two proven protection systems.
The first choice is 2K urethane clear coat with UV blockers. The 2K clear coat cures into a hard shell. It sprays on like factory paint, giving years of weather protection.
The second choice is ceramic coating made for plastic. Liquid silica bonds with plastic pores to create a glass shield. It repels bugs, resists dust, and blocks UV rays.
Headlight Repair Method Comparison: DIY Wipe vs Polish vs Pro Restoration
The table below compares three common headlight repair methods:
| Repair Feature | DIY Toothpaste / Bug Spray | Quick Solvent Wipe Kit | Professional Wet-Sand & UV Clear |
|---|---|---|---|
| Oxidation Removal Depth | Shallow surface oil only | Melts top 1 micron chemically | Sands away 100% of dead plastic |
| Light Output Recovery | 10% to 20% improvement | 40% to 60% improvement | 95% to 100% factory beam restored |
| UV Protection Layer | None (bare plastic exposed) | Thin mineral wipe (fails fast) | Durable 2K urethane or ceramic shield |
| Result Longevity | 2 to 4 weeks | 2 to 3 months | 3 to 5+ years of clarity |
| Time Invested | 10 minutes | 20 minutes | 1.5 to 2.5 hours of precision work |
| Roadworthy Compliance | Fails Pink Slip inspections | May pass briefly, then fades | Guaranteed roadworthy beam pattern |
The 10-Point Headlight Restoration Workshop Checklist
Professional detailers follow these ten steps during a complete headlight restoration service:
- Beam Pattern Assessment: Test headlight beam alignment and light projection on a workshop wall before starting.
- Surrounding Panel Masking: Apply two layers of heavy automotive masking tape around bumper and wing paint.
- Lens Decontamination Wash: Clean lenses with alcohol cleaner to remove grease, bug splatter, and road tar.
- Coarse Wet Sanding (800-Grit): Sand away yellowed dead plastic until clean white slurry appears.
- Intermediate Sanding (1200 & 1500-Grit): Smooth coarse sanding marks with finer wet-dry sandpaper passes.
- Fine Finishing Sanding (2000 & 3000-Grit): Refine the plastic with ultra-fine finishing discs to a smooth satin finish.
- Heavy Rotary Compounding: Buff the lens with plastic cutting compound to eliminate 3000-grit marks.
- Jewelling Polish Pass: Polish the lens with fine foam pads to restore 100% optical clarity.
- Alcohol Panel Wipe: Clean all compound oils off the lens with pure isopropyl alcohol.
- UV Protective Clear Coating: Apply a durable 2K UV urethane or ceramic coating and cure with infrared heat.
Pre-Sale Visual Value and Roadworthy Buyer Reassurance
Headlights are like the eyes of your car. Cloudy lenses make an otherwise clean vehicle look aged, tired, and neglected. Buyers scrolling through Carsales or Marketplace notice cloudy headlights immediately.
Clear headlights transform front-end looks. They make a ten-year-old car look well kept. More importantly, clear headlights reassure buyers that the car will pass its annual roadworthy Pink Slip check without extra repair bills.
For sellers, spending a small sum on headlight restoration often returns three to five times that cost in higher buyer offers. It removes a major bargaining point for buyers looking for price discounts.
Routine Care Habits to Keep Headlights Clear
Once headlights are restored, simple care habits keep them clear for years. Easy preventative care protects your investment.
Follow these easy tips: 1. Wash with Gentle Car Soap: Use pH-neutral car soap instead of dishwashing liquid or harsh degreasers. 2. Park Out of Direct Sun: Park in garages or under carports when possible to reduce solar UV exposure. 3. Clean Off Bugs Quickly: Wash bug splatter off lenses weekly so acidic residues do not etch the clear coat. 4. Apply Ceramic Boosters: Spray a quick detailer with UV blockers over lenses every three months to boost protection.
Fog Light and Tail Light Lens Polishing
While main headlights take the most sun, fog lights and tail lights suffer too. Bumper fog lights sit low to the ground. They take heavy gravel hits and road sand on unsealed country roads.
Tail lights use coloured acrylic plastic. Over time, automatic car washes leave swirl marks and grey haze across red lenses. Detailers polish fog lights and tail lights using mini rotary polishers with three-inch pads. After polishing, a ceramic sealant is applied. This restores bright red clarity to tail lights, ensuring brake lights and indicators shine bright to following drivers.
Paint Protection Film as a Physical Headlight Shield
For drivers travelling gravel country highways, adding physical protection is smart. A liquid UV coating protects against sun fading, but it cannot stop sharp stone chips at 100 kilometres per hour.
Applying clear paint protection film (PPF) over freshly restored headlights creates an eight-mil thick polyurethane shield. This flexible film absorbs stone impacts without cracking. The film also has built-in UV blockers to stop plastic yellowing. If gravel scuffs the film, self-healing polymers smooth out scratches under warm engine heat. This keeps headlights looking brand new for years.
Headlight Aiming and Optical Beam Alignment
Once headlights are crystal clear, checking beam alignment is essential. Faded lenses scatter light, hiding poor headlight aim. After lenses are polished, a misaligned bulb can shine directly into oncoming drivers' eyes.
Professional workshops check beam aim against a measured calibration wall or optical beam setter. Technicians adjust horizontal and vertical adjustment screws on the rear of the headlight bucket. The sharp beam cutoff line is set at factory specifications. This ensures maximum road coverage on dark country roads without blinding oncoming traffic.
High-Output Bulb Upgrades and Lens Clarity
Many drivers blame dim headlights on old bulbs when foggy lenses are the real problem. However, pairing fresh lens restoration with modern high-output bulbs delivers incredible night vision.
Halogen bulbs lose up to thirty percent of brightness over three years as tungsten filaments degrade. Installing premium plus-one-hundred-percent road-legal halogen bulbs or certified LED upgrades inside crystal-clear restored lenses doubles forward beam throw. This upgrade gives drivers maximum safety on dark country highways.
Transport for NSW Vehicle Standards and Safety Rules
Vehicle safety regulations set by Transport for NSW require all registered motor vehicles to have working headlights with focused beam patterns. Headlight lenses must be clean and free of severe fading to ensure oncoming drivers are not blinded and roads are properly lit.
During workshop restoration, technicians must adhere to safety rules enforced by Safe Work Australia. Staff wear safety goggles, dust respirators, and nitrile gloves when wet-sanding plastic and spraying 2K clear coats.
Under fair trading rules from the Australian Competition and Consumer Commission, detailing shops must provide honest advice regarding lens restoration longevity and warranty terms.
If your headlights are cloudy, yellow, or failing Pink Slip inspections, choosing trusted pre-sale detailing and restoration by Detailing Mates guarantees your vehicle regains factory optical clarity and roadworthy safety.
People Also Ask About Headlight Restoration
Can yellow headlights pass a NSW Pink Slip inspection?
Severe yellowing or fogging that reduces light output or scatters beam patterns will fail an annual NSW Pink Slip inspection. Headlights must produce a clear, focused white beam to pass registration checks.
How long does professional headlight restoration last?
When sealed with a quality 2K UV clear coat or ceramic protection, professional headlight restoration lasts between 3 and 5 years. DIY kits without UV coatings usually fail within 3 months.
Is it cheaper to restore headlights or buy replacements?
Restoring headlights is far cheaper than buying new units. New headlight assemblies on modern vehicles cost $1,200 to $3,500 each, whereas professional restoration costs a fraction of replacement prices.
Why do car headlights turn yellow in the first place?
Modern headlights use polycarbonate plastic. Solar ultraviolet rays break down the plastic polymer chains once the thin factory UV clear coat wears off from road gravel, sun, and washing.
Frequently Asked Questions on Headlight Care
Does headlight restoration fix cracks inside the lens?
No. Surface restoration wet-sands external plastic oxidation. Internal condensation or deep structural cracks inside the plastic housing cannot be polished away and require housing replacement.
Can I drive my car immediately after headlight restoration?
Yes, but avoid washing the vehicle for 24 hours if a ceramic coating was applied, or 48 hours for 2K clear coats. This allows the protective UV layer to cure to full hardness.
Does wet sanding scratch the headlight plastic permanently?
Wet sanding creates fine, controlled scratches that remove dead plastic. Each finer sandpaper grit smooths out the previous cut, until machine polishing restores 100% optical clarity.
Why shouldn't I use insect repellent to clean cloudy headlights?
Insect repellents contain DEET, a strong solvent. DEET melts the top layer of polycarbonate plastic. While it looks clear briefly, it permanently damages the plastic, making it brittle and crazed within weeks.
How long does a professional headlight restoration service take?
A professional restoration service typically takes 1.5 to 2.5 hours for both headlights. This allows time for multi-stage sanding, precision machine polishing, and protective UV coating application.
Conclusion: Restoring Night Driving Safety and Vehicle Value
Clean, clear headlights are vital for road safety and vehicle presentation. Driving with foggy, yellowed headlights endangers your family on dark regional roads and risks failed roadworthy Pink Slip checks.
Investing in professional headlight restoration and uv protection permanently clears dead plastic, restores factory beam distance, and protects your lenses for years. Whether you are keeping your car for family road trips or preparing it for private sale, clear headlights ensure bright visibility and pride of ownership. Restore your headlights today and drive with confidence day and night.